Wednesday 14 March 2012

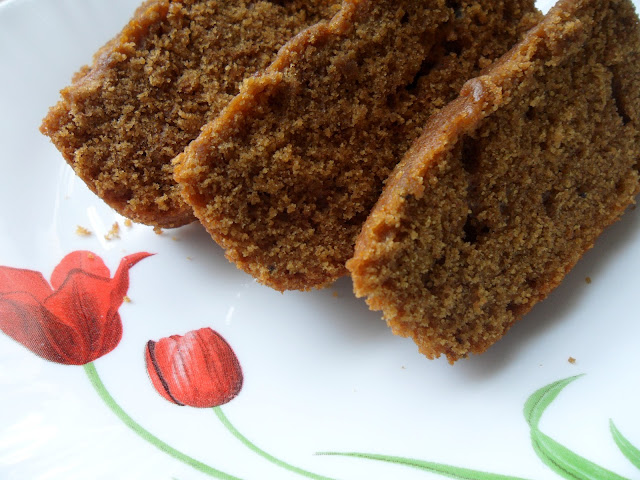
Chocolate Banana Cake


 Another gem from Joy of baking....for all those who love chocolate.. :) It is so easy to make, just mixing the dry ingredients in one bowl and the wet ingredients in another..and then..just beat them up together. You don't even need an electric beater, a hand whisk would do. What you finally get is a dark chocolate cake with a faint banana taste.....and it is yummy.... :)

Although the cake is very soft, I have used it layered with cream cheese frosting and ganache for birthdays and was received well, I think :) It can also be frosted with whipped cream...endless ways you can turn it into your favorite dessert...:)


I have always noticed that this cake tastes better on the next day (I never show it to my son soon after baking...just tell him his chocolate cake will be ready only tomorrow)

Ingredients
  • 2 cups (400 gm) granulated white sugar
  • 1 3/4 cups (245 gm) all purpose flour
  • 3/4 cup (75 gm) unsweetened cocoa powder
  • 1 1/2 teaspoon baking powder
  • 1 1/2 teaspoon baking soda     (refer note on leavening agents)
  • 1/2 teaspoon salt
  • 2 large eggs
  • 1 cup mashed ripe bananas
  • 1 cup (240 ml) warm water
  • 1/2 cup milk
  • 1/2 cup vegetable oil (corn or sunflower or any flavourless oil)
  • 1 1/2 teaspoon vanilla extract
Preheat the oven to 350 degrees F and place the rack in the center. Butter and line the bottom of a 9 x 13 inch (23 x 33 cm) pan with wax paper.
In a large bowl mix together sugar, flour, cocoa powder, baking powder, baking soda and salt.
In another bowl, whisk the eggs, banana, milk, oil, vanilla and water.
Add the wet mix into the dry ingredients and whisk until combined. The batter will be thin.
Pour into the prepared pan and bake for about 35-40 minutes or until a toothpick inserted into the center comes our clean.
Take the cake out of the oven and allow to cool on a wire rack.
As I told earlier.. serve it the next day...:)


Tuesday 6 March 2012

A Birthday Cake

I think birthdays are times, when those culinary scientists decide to smother their loved ones with the results of their experiments.:)....
It was Papa's birthday....(and he has a sweet tooth..)..so this time, I decided to try out a new cake recipe. I wanted something white..but not plain..and finally got one from Allrecipes.com, which I thought would be nice. It was a white chocolate cake with nuts and coconut.
The cake, by itself was firm and I have a small feeling I baked it a little longer than necessary. It was supposed to be done in a 9" round pan and I made it in a bundt pan. So I just baked it a little more. Anyway no harm done... :) The frosting was plain whipped cream... not too sweet as the cake was sugary enough. (because of the white chocolate in it, maybe). I didn't know how it would turn out to be.. :) and was finally glad when the thumbs up sign came. The firm nutty cake with the soft whipped cream was a good combo and if you like coconut, you are going to love this dessert.
Here is how I made it..

White chocolate cake with nuts and coconut


(The original recipe made 3, 9" cakes, so I made only one-third of the mix as I didn't need such a big cake. The recipe given below is the original one.)

 Ingredients:
  • 4 (1 ounce) squares/ 112gm white chocolate, chopped
  • 2 1/2 cups sifted cake flour
  • 1 teaspoon baking powder
  • 1/2 teaspoon salt
  • 1 cup butter
  • 2 cups white sugar
  • 4 egg yolks
  • 1 teaspoon vanilla extract
  • 1 cup buttermilk
  • 1 cup chopped pecans or almonds (I used almonds and cashew)
  • 1 cup flaked coconut
  • 4 egg whites
I dry roasted both the nuts and coconut separately for about 5 minutes before adding them to the mix. It will improve the flavour of the nuts.
  1. Preheat oven to 350 degrees F (175 degrees C). Grease and line 3 (9 inch) pans with wax paper. Sift together the flour, baking powder and salt. Set aside.
  2. Put the white chocolate in a heat proof bowl and melt it over a pan of simmering water. In a large bowl, cream together the butter and sugar until light and fluffy. Beat in the yolks one at a time, then stir in the melted chocolate and vanilla. Fold in the flour mixture alternately with the buttermilk. Stir in the nuts and coconut.
  3. In a large glass or metal mixing bowl, beat egg whites until stiff peaks form. Fold 1/3 of the whites into the batter, then quickly fold in remaining whites until no streaks remain. Divide batter into prepared pans.

  Bake in the preheated oven for 40 to 45 minutes, or until a toothpick inserted into the center of the cake comes out clean.( I baked for 50-55 mins, as I used a bundt pan. The time varies, depending on your oven.) Allow to cool.


           The cake was frosted with sweetened whipped cream. You can also give a layer of whipped cream or custard sauce in the middle after halving it horizontally.


Saturday 3 March 2012

A lunch with Bitter gourd

I know that all people have one or the other weird tastes and cravings... and I used to think, those who liked the Bitter-gourd were indefinitely weird... until one fine day, when I finally started loving this bitter vegetable. :)
Towards the end of our college days, we were required to stay at different NGOs and give a report on them. Myself and some of my classmates stayed in one run by a few christian priests, which had a self sustained farm of their own, apart from their usual social work. It was during my stay there that I developed my first liking for this vegetable which was given to us as a stir-fry with coconut...(perhaps it was because of the relaxed nature of our surroundings..or the 'fresh from the farm' vegetables..I couldn't say)... Anyway it was delicious and I don't think we would have needed any other side-dish for our rice... :) .. But though I liked it very much there, my mother's versions of the same had no effect on me, until one of my cousins..(she is a pretty good cook) showed me how she made it and so.... I got hooked again...:)
My weird taste allows me to have this with plain rice...enjoying every mouthful, and that's how it was for lunch yesterday... Papa had brought a bagful of this veggie (straight from his farm) and I decided.... Bitter-gourd and coconut stir-fry, it would be...


Ingredients:
  • 1 cup finely chopped Bitter-gourd ( I just removed the seeds and used the chopper)
  • 1 cup fresh grated coconut  (using the same quantity of coconut counters the bitter taste)
  • 4 green chillies, chopped
  • 1 large onion, sliced
  • 3-4 cloves of garlic, chopped
  • a sprinkle of chilli flakes 
  • a few curry leaves
  • 1/2 teaspoon turmeric powder
  • 1/2 teaspoon pepper or according to taste
  • salt
  • oil (coconut is preferred)
Put the coconut and bitter-gourd in a bowl, tear in a few curry leaves, add some salt (about 1/4 teaspoon), sprinkle some coconut oil and rub them all together for a minute. Pat the mix down and keep it aside.
Heat 1 or 2 tblsp oil in a pan and add the garlic, chillies, onions and curry leaves and saute for some time adding a pinch of salt. Let it brown slightly and then add the turmeric and chilli flakes and stir again for few seconds.
Now add the bitter-gourd mixture to the pan, give a stir and close the lid. Allow it to steam up on medium flame.Give it a few minutes and then open the lid and stir again.
Taste and add salt and pepper accordingly. Cook until done stirring occasionally. (it might take about 10 minutes.) It should be a little fried but not browned.
Serve hot with plain rice... Enjoy!! vegetarian meal

Wednesday 29 February 2012

Falafel recipe

Here is the recipe for those patties I posted last week...
I have added a teaspoon of chilli flakes to make it spicy. My friend had said.. spice and salt according to taste.

Ingredients:
  • 1 cup dried chickpeas
  • 1 large onion, chopped
  • 2-3 cloves of garlic, chopped
  • 1 green chilli chopped
  • 1 teaspoon red chilli flakes 
  • 1 teaspoon ground coriander
  • 1/2 teaspoon ground cumin
  • 1 tablespoon coriander leaves/ cilantro, chopped
  • 1 tablespoon grated carrot (if you like)
  • 2 tablespoons flour or more if needed
  • a pinch of baking powder
  • 1 teaspoon salt or more
  • oil for frying
Rinse chickpeas in a bowl and allow to soak overnight.
Drain the chickpeas and set aside.
In a pan, over medium heat, add 2 tablespoons oil and saute onion and green chilli for 2 to 3 minutes then add garlic and cook until translucent, about 5 minutes.
In a food processor, pulse together chick peas, red chili flakes and ground cumin and coriander to form a coarse consistency. Add water only if necessary, as little as possible. Then add flour, salt, and cilantro. Pulse until mixture starts pulling from the sides of the food processor.
Remove mixture to a large bowl and mix in the onion mixture and grated carrot. Chill falafel mix until ready to cook.
Before forming the mix into balls, check and add more salt or pepper if needed. Now mix in the baking powder as evenly as possible.
Heat the oil needed for frying.
Roll the dough into balls, slightly flatten them and deep fry until browned, turning as needed.
Drain on paper towels and serve hot with yoghurt dip or use it as a filling in pita bread.
snack, starter ,easy

Tuesday 28 February 2012

Weight of common ingredients in gram


Ingredient Weight -
(ounces)
Weight -
(grams)
1 cup of whole wheat flour (sifted, then measured)                4.5 oz 125 g
1 cup of All Purpose flour (spooned into the cup) 4.25 oz 121 g
1 cup of AP flour (sifted, then measured) 4 oz 114 g
1 cup of cornstarch (lightly spooned or sifted) 4.2 oz                        120 g                   
1 large egg (in the shell) 2 oz 56.7 g
1 large egg (without shell) 1.75 oz 50 g
1 large egg yolk .65 oz 18.6 g
1 large egg white 1.05 oz 30 g
1 cup of butter 8 oz 227 g
1 cup of clarified butter or ghee 6.8 oz 195 g
1 cup of vegetable shortening 6.75 oz 191 g
1 cup of vegetable oil 7.7 oz 218 g
1 cup water 8.3 oz 236 g
1 cup of heavy cream 8.2 oz 232 g
1 cup of sour cream 8.5 oz 242 g
1 cup of full-fat yogurt 8.6 oz 243 g
1 cup of buttermilk 8.5 oz 242 g
1 cup of whole milk 8.5 oz 242 g
1 cup half and half 8.5 oz 242 g
1 cup mascarpone 8.8 oz 250 g
1 cup of granulated sugar  7 oz 200 g
1 cup of dark brown sugar (packed) 8.4 oz 239 g
1 cup of light brown sugar (packed) 7.7 oz 217 g
1 cup of powdered sugar (dip and sweep) 4 oz 125 g
1 cup of honey 11.75 oz 336 g
1 cup of molasses 11.25 oz 322 g
1 cup of corn syrup 11.5 oz 328 g
Cocoa – nonalkalized or natural (dip and sweep) 3.33 oz 95 g
Cocoa – nonalkalized or natural (spooned into the cup) 2.9 oz 82 g
1 cup almonds – whole 6.7 oz 191 g
1 cup almonds – slivered 4.2 oz 120 g
1 cup almonds – sliced/coarsely chopped 2.6 oz 75 g
1 cup almonds – finely ground 3.7 oz 107 g
1 cup almonds – powder fine 3 oz 89 g
1 cup pistachios – whole 5.32 oz 152 g


Leaveners and other ingredients                                                                                                         
1 tsp baking powder
4.9 g
1 tsp baking soda
5 g
1 tsp yeast, instant
3.2 g
1 tsp yeast, active dry
3.1 g
1 tsp salt
6.7 g
1 tsp gelatin, powdered
3.1 g
1 tsp vanilla extract
4 g
1 tsp cream of tartar
3.1 g
1 cup raisins 5 oz 144 g

It might be helpful to refer How to measure in Baking 
volume conversions, weight to volume conversions,

Saturday 25 February 2012

Curd Rice/ Yoghurt rice

I remember my school days in the hostel, when we boarders who did not go home for the festival holidays were treated by those lucky ones who went...with lots and lots of goodies from their homes..:) One such comfort food that came with the package was the simple curd rice. This dish...in all its simplicity..makes you wonder how an unappealing bowl of over cooked rice is transformed into a delicious wholesome dish. So that is exactly what I did when I found out that I had overdone my rice...sneakily transformed it into our Curd rice... and saved the day!!!
Here is the recipe....

Ingredients
Cooked rice - 2 cups
Curd/ yoghurt - 1 cup
Oil - 2 tablespoons
Mustard seeds - 1/2 teaspoon
Red chillies - 2-3
Green chillies - 4-5
Grated coconut - 1/4 cup
Coriander leaves - 5-6 sprigs
Curry leaves
Salt to taste

Mix the curd with rice in a large bowl. Both rice and curd must be at room temperature. Add salt according to your taste.
Chop the green chillies and coriander leaves and saute with 1 tablespoon of oil in a pan. Now add the coconut with little salt and fry it for about a minute on medium flame. Mix this with the rice and set aside for some time.
Heat the rest of the oil in a pan and add mustard. Allow it to pop and add the red chillies and curry leaves and fry them till crisp. Pour it over the rice, mix and serve.
It can be served with a chicken dish or just have it with some pickled vegetables.
There are always variations to be tried in any recipe..some grated cucumber or carrot can be mixed in...or you can also garnish with cashews and raisins...
vegetarian meal

Friday 24 February 2012

Coffee Cake

That is my coffee flavoured cake made with custard powder..as I said I would be trying... a variation of the plain Custard powder Cake. I added an egg after creaming the butter and sugar and what I got is a super-moist cake...which was delicious. The only snag is that I used only the original quantity of sugar mentioned in the earlier recipe and so it was less sweet than usual but nevertheless delicious. I think it would be wonderful to layer it with vanilla buttercream after soaking it with some orange juice and finally topping with chocolate ganache... :) A perfect dessert...try it.


Coffee Cake
  • 1 1/2 cups all purpose flour
  • 3/4 cup vanilla flavoured custard powder
  • 2 1/4 tsp baking powder
  • 1-2 tsp cocoa powder 
  • 3/4 cup granulated sugar ( you can add 1-2 tablespoons more if you want to)
  • 1  tsp vanilla extract
  • 150 gm butter, at room temperature
  • 1 egg
  • 3/4 cup milk
  • 1/4 cup strong coffee
This recipe makes one 9” cake or 8 to 10 servings.
  • Preheat the oven to 180 C (350 F). Grease a 9" cake tin with butter and line the base with wax paper.
  • Put the dry ingredients except sugar in a bowl. Use a wooden spoon and mix well.
  • Beat the butter until light in a large bowl and then add the sugar and beat well until fluffy.Add the egg and vanilla extract and beat again. 
  • Now combine the milk with coffee. 
  • Add the dry ingredients to the butter mix (in 3 batches) alternating with the coffee-milk mixture(in two batches).
  • Pour the batter into the cake tin and bake at 180C (350F) for about 45 minutes to an hour or till the cake is done and a skewer poked into the cake comes out clean. Sometimes, depending upon your cake tin and the oven, this cake might take about an hour to cook especially in the middle.
  • Cool on a rack and serve.

snack

Wednesday 22 February 2012

Falafel

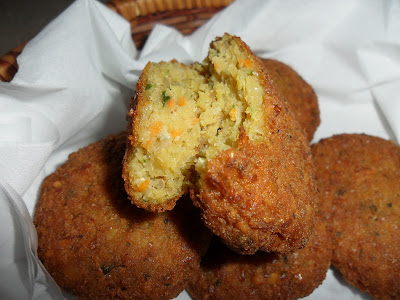
Yesterday, a Sudanese friend of mine gave me this mix...and she told to add salt and pepper to my taste, a pinch of baking powder and deep fry it after making into small flattened balls.... and here is what I got... the famous Middle eastern dish, Falafel.
I haven't eaten Falafel before and on tasting it I thought of likening it to an Arab version of the South Indian Dal Vada. They are very nutritious and can be used as a starter or snack or as a filling in sandwich wrap.  
Anyway.........these deep fried patties were delicious (thanks to her for introducing me to this new dish) and I intend to learn how to make the mix. I know it is made with chick peas, onion, etc... but.. I'll post the recipe after I get it from her.. :)


Thursday 16 February 2012

How to Measure in Baking

Measuring accurately is probably the most important cooking skill in the kitchen especially when you are baking. I have had some trouble with this earlier and so decided to make a post for future reference or for some poor souls who struggled like me.. :)
To begin, make sure that you have actual commercial measuring utensils.Measuring cups and measuring spoons are needed and try to get them in different measures i.e. cups in 1/4 cup, 1/3 cup, 1/2 cup, 1 cup, and 2 cup sizes and spoons usually range from 1/8 teaspoon, 1/4 teaspoon, 1/2 teaspoon, 1 teaspoon, and 1 tablespoon.Approximating with your teacup or stainless coffee spoon is just not okay! For liquid ingredients, you need a graduated, clear, glass or plastic cup with a pouring spout.So here is a basic guide to measuring common ingredients.
  • Flour
    Stir flour in the storage container or bag. Using a large spoon, lightly spoon flour from the container into the measuring cup. Do not shake the cup and do not pack the flour. Using the back of a knife or flat blade spatula, level off the flour even with the top edge of the measuring cup. Don't use the measuring cup to scoop the flour out of the container. 
  • Baking powder and Baking Soda
    Stir in the container. Using the measuring spoon, lightly scoop out of the container. Use that knife to level off even with the top edge of the measuring spoon. 
  • Granulated white Sugar
    Sugar is measured by scooping the cup or measuring spoon into the container or bag until it is overflowing, then leveling off with the back of a knife. Do not shake the cup and do not pack the sugar.  
  • Brown Sugar
    This needs to be packed into the measuring cup. The sugar should retain the shape of the cup when it is dropped into the other ingredients.  
  • Powdered Sugar
    Powdered sugar usually needs to be sifted to remove small lumps. It is measured by spooning the sugar into the measuring cup from the container, then leveling off with the back of a knife. 
  • Liquid Ingredients
    Liquids need to be measured at eye level. Using the liquid measuring cup, pour the liquid into the cup. Then bend over so you are on the same level with the measuring marks. The liquid should be right at the mark, not above or below. 
  • Semi-Liquid Ingredients
    Ingredients like sour cream, peanut butter, and yogurt are measured using dry measuring cups because they are too thick to be accurately measured in the liquid cups. Level off sour cream and peanut butter with the back of a knife.
  • Shortening and Solid Fats
    Butter and margarine have measuring amounts marked on the sides of the paper wrapping. It is better to use the weight equivalent i.e.1 cup of butter equals 226 g.
  • Liquid Ingredients in Spoons
    Make sure that you don't measure small amounts of liquid ingredients over the mixing bowl. It's just too easy to spill, and you don't want 2 teaspoons of almond extract when the recipe only calls for 1 teaspoon!  
  • Dry Ingredients in Spoons
    Ingredients measured in these small amounts still have to be measured carefully. Overfill the measuring spoons and level off using the back of a knife for the most accurate amounts. Accurate amounts of ingredients like baking soda and powder are critical to the success of any baked product. 
  • Chopped Ingredients
    Pay close attention to whether or not an ingredient is to be chopped or minced, and whether they are measured before chopping or after. Then they are placed in the measuring cup so the top is level with the ingredient.

Please read the entire recipe before you decide to cook and it is better to measure or weigh out all your ingredients, keeping them ready, before you begin.
When you bake cookies, cakes, breads, pie crusts, and candies, measuring accurately is really critical to the success of the recipe. When you are cooking casseroles, soups, stir fries, and meats, you can vary amounts more and the end result will still be good.

Wednesday 15 February 2012

Chicken Pizza


How would you like to make your pizza from scratch??? The exact method for creating a pizza is simple, though it does vary a little by recipe.You can begin by making the dough. The basic ingredients for dough are water, flour, salt, and yeast. Variations include olive oil, sugar, and spices. The sauce comes next. Most pizzas have a tomato sauce with ingredients like basil, olive oil, and garlic, but there are tons of alternatives and additional flavors one could add. After that there are the cheese and toppings. Almost any type of cheese can be used, but I used mozzarella and cheddar. You can put the toppings on over the cheese so that they can be shown off...:) or put the toppings underneath the cheese so that the toppings can become extra bubbly. The beauty of it is that there is no right way to do it – making your own homemade pizza ensures that the best possible recipe is created for everyone's enjoyment! 
My recipe here is adapted and adjusted according to my taste... :)...but....as I have seen that it is enjoyed by others too...I have decided to put it up...for anyone who might like to have a go at making their own pizza including the dough... Good luck !! :)
                        Chicken Pizza with Tomatoes, Capsicum and Onions

For the dough:
  • 3 cups all-purpose flour
  • 1 cup whole wheat flour
  • approx. 1 cup very warm water
  • 2 Tablespoons sugar
  • 1 teaspoon salt
  • 2 Tablespoon olive oil or 1/4 cup butter
  • 1 egg
  • 2 teaspoon active dry yeast
Combine water, sugar, and butter/oil in a bowl.
Mix wheat flour, yeast, and salt in a large mixing bowl; stir well. Gradually add the warm liquid mixture, beating with your hand or an electric mixer at low speed for one minute.
Add egg, and beat an additional 2 minutes at medium speed. Gradually add all- purpose flour to make a soft dough. Add more water or flour if necessary. Turn dough out onto a heavily floured surface, and knead until smooth and elastic (about 8 minutes). 
Turn the dough inside out and with the seam side down, put the dough in a large bowl coated with oil. Coat the dough also with a little oil. Cover the bowl with a plastic wrap.Keep it in a warm place undisturbed and free from drafts.
Let the dough rise and double in size.(maybe 1 hour or more depending on the weather) After it has doubled, punch down and divide into 3 equal balls and let it rest for another 20 to 30 minutes.
Then place one of the balls on a buttered pan and flatten it with your palm. Now, slightly stretch it to all sides with your palm, retaining the circular shape...to about 10 inch diameter. Do this slowly allowing the dough to rest for five minutes in between. Your pizza base is ready. Add the sauce and toppings.

Toppings (for 3 pizzas):
  • 1 cup pizza sauce 
  • 3 chicken breasts (or an equivalent amount), cooked and diced
  • 1 large onion diced
  • 2 green peppers/capsicum chopped
  • 2 tomatoes diced
  • 1 or 2 cloves of garlic grated
  • 1/4 teaspoon red chilly powder
  • 1 cup mozzarella cheese shredded
  • 1 cup cheddar cheese shredded

To brush on:
  • olive oil
  • 1 clove of garlic
  • 1 egg
  • 1 tablespoon milk
(The chicken used can be of any flavour and the taste of your topping depends on it. I would suggest garlic chicken or chicken tikkas.)

Preheat the oven to 450 degree F.
Mix the vegetables with the grated garlic, chilly powder, olive oil and some salt. 
Prick the base all over with a fork.Crush the garlic and add it to some warm olive oil.Allow it to infuse for some time. Then brush the base liberally with this and pour 1/3 of the sauce onto it.
Arrange the vegetables and chicken.
Drizzle with more oil.
Bake the pizza for about 10 minutes and then take it out and add the cheese. Brush all over with eggwash (egg beaten with little milk and a pinch of salt)
Bake again for another 10 minutes or until the crust is golden brown in colour and the cheese has melted and browned. The bottom of the crust will be light brown.
Serve immediately.


Sunday 12 February 2012

Chocolate Wafer Cookies


My 5-year old is a chocolate fan....(and so am I).. So he asks me (every time I say I'm going to cook something special) ..Is it chocolate **** or chocolate ****.????.. :) it is always something that starts with chocolate. What can you do..:) when your own heart is singing the same song......but to yield to the whims of a young chocolate lover. This time I made him some chocolate cookies, the recipe from joyofbaking.com, which was very easy. I got a lovely chocolate flavoured biscuit,  after eating which I decided to say goodbye to my favorite Bourbon biscuits... It is a 'must try' for all the chocolate freaks who would like to try their hand at baking a cookie...(it is very easy) So here it is....

                   Chocolate Wafer Cookies
  •  1 cup (130 grams) all purpose flour
  • 1/2 cup (50 grams) unsweetened cocoa powder (regular or Dutch-processed) *I used just 1/4 cup cocoa and added additional 1/4 cup of flour*
  • 1/4 teaspoon baking soda
  • 1/4 teaspoon salt
  •  6 tablespoons (90 grams) unsalted butter, room temperature
  • 2/3 cup (140 grams) packed light brown sugar
  • 1/2 cup (100 grams) white granulated sugar
  • 1 teaspoon pure vanilla extract
  • 1 large (30 grams) egg white
In a bowl, sift or whisk together the flour, cocoa powder, baking soda, and salt.
In the bowl of your electric mixer (or with a hand mixer), beat the butter until light. Add the sugars and vanilla extract and beat on high speed for about one minute. Scrape down the sides of the bowl. Beat in the egg white. Add the flour mixture and beat just until incorporated.

Place the dough on your counter and, using your hands, evenly form the dough into a log shape that is about 9 inches (23 cm) long. Carefully wrap the dough in parchment paper or wax paper and fold or twist the ends. Try not to flatten the log. Refrigerate until firm. This will take several hours or you can even chill it overnight.

Preheat the oven to 350 degrees F (177 degrees C) and place the oven rack in the center of the oven. Line two baking sheets with parchment paper.

Using a sharp knife, slice the log into about 1/4 inch (6 mm) thick wafers. Place the wafers on the baking sheet spacing, about 1 inch (2.5 cm) apart. Bake for approximately 10 - 12 minutes or until the the cookies puff and the tops of the cookies have cracks (ripples). Remove from oven and let the cookies cool on the baking sheet for about 5 minutes before removing to a wire rack to cool completely. Can be stored in an airtight container, at room temperature, for about 10 days. They can also be frozen.

My cookies were cut using different cutters at my son's insistence.... :) 

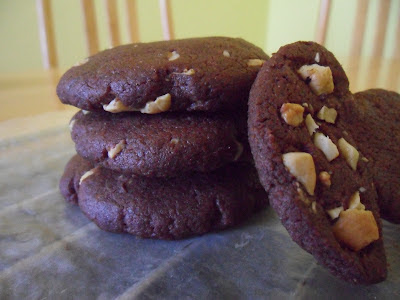
In the picture below are some cookies I made by adding some crushed cashew nuts to a little dough. They are not crisp but chewy as the contain nuts. 
The cookies with nuts
snack